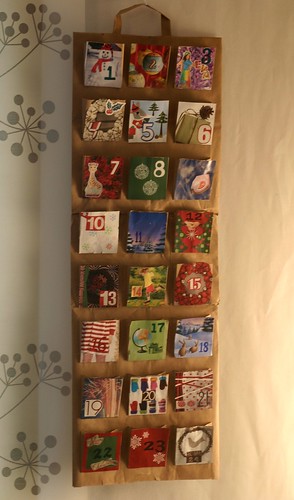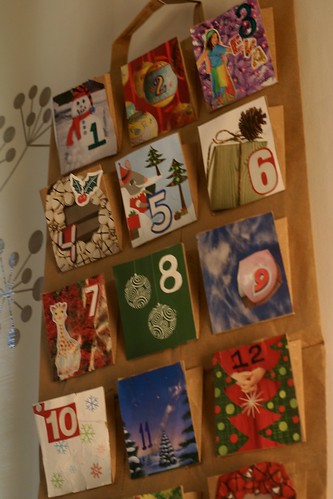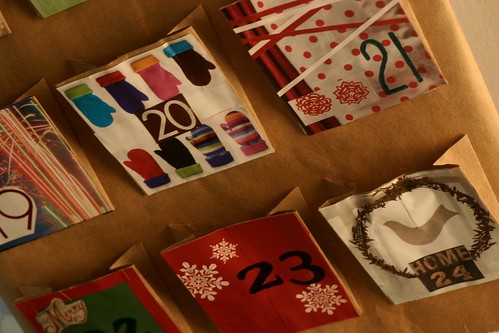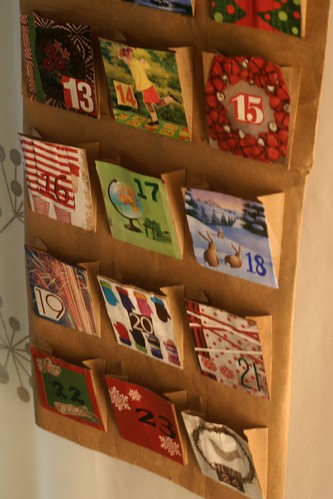
it may sound silly, but i was recently freaking out about advent calendars. i'd say it officially kept me awake at night (once). i wanted to make just the right kind, something we'd keep and use year after year -- but i didn't have the time to make the sort of thing i had in mind. i meant to start on it this past summer, but then -- oh yeah -- i went and had a baby. i guess that took some of my free time.
but then i was filtering through the dozens and dozens of catalogs in our stack of mail that was held during our recent month away... and i knew just what to do. i decided we'd make an advent calendar entirely from the recycle bin (okay. plus some glue and tape). bonuses: 1. eva gets to help make it. turns out she's a whiz kid at cutting out squares. 2. it's cheap. 3. it's green. 4. it can be completed in fewer than four months.
i bought a rosemary topiary (shaped like a baby-sized christmas tree), and i've chosen to fill our advent calendar with tiny ornaments for our "tree". (what? no chocolate? i'm catching flack from everyone about that... everyone but my kid, that is, because she doesn't know what she's missing.) i'm making tiny ornaments out of scraps of things we have around, like a pipe cleaner candy cane, a peanut shell painted sliver, some jingle bells, craft pompoms strung on a twist-tie to make a little wreath, cardboard star covered with scraps of foil, etc. i've only made seven or so thus far, but i like that i only have to stay a few days ahead, and can complete the rest at my leisure. :)
so here you go, a mini tutorial of how we made our advent calendar. sorry, no photos of the process itself, but it's not terribly difficult. (in fact, sorry for the state of these photos in general -- the camera fell off the roof of a car on a mountain highway a few months ago, and the various rubber bands and wedges of paper are no longer sufficient to keep it working... it's no longer able to focus, manually or otherwise. hmm... guess what we're buying each other for christmas?)

supplies & tools
catalogs/magazines
2-3 brown paper grocery bags (one with handles if possible)
ad circulars/newspaper inserts (optional)
glue/tape
scissors
a holiday-obsessed preschooler, if you have one handy
1. collect and peruse catalogs
unless you're conscientious like my mother and have called the 800-number of every company that sends you junk mail to get off their mailing list, you probably have stacks of catalogs and magazines arriving in your mailbox this time of year. rip out images you think might be useful -- beyond the obvious holiday and winter scenes, look for areas of solid colors interesting backgrounds. (most of my pockets are decorated collage-styls, even when it may look like a single image -- a person has to get creative to cover up ad copy. :)
2. find those ad circulars in your recycle bin
you need numbers. large numbers! catalogs are far too tasteful to list their prices in giant yellow 48-point font -- so you'll have to look in the ad inserts. these show up in my mailbox, or if you get the newspaper, that would be helpful. cut out all the numbers you think you'll need, but don't stress that nothing seems to cost $17.23... you may have to hand write the 17 and 23 (but i promise you'll find endless options for the 9).
3. create the backing of the calendar
to make the backing, you need to open up a brown bag (the one with a handle if you have it) into a long strip. cut down the two narrow sides of the bag, veering out to the corners at the bottom (basically, just cut along the upside-down Y-shaped fold lines on the side panels). flatten bag with "wrong"/printed side facing up. roll the side flaps until they are hidden on the back of the bag and tape in place. you can choose to cut them off or simply fold & glue them to the back, but i found rolling them provides more structural support along the sides, allowing the advent calendar to hold more weight without bowing and bending. cut a strip from another bag, roll it up, and tape it along the top edge of your calendar to create additional reinforcement there. if your bag has handles, you can remove the one from the bottom if you like.

4. cut dozens of pockets (two dozens, to be exact)
next you need to cut out 24 pockets from the additional brown bags. i made my pockets 3" wide and 3.25" tall because that's what fit on the paper bag i had (8 rows of three), but you can adjust this as needed. i found triangular-shaped gussets on the sides of the pockets allowed larger items to sit comfortably inside -- to form these, i flared out at a 30 degree angle from the bottom corner of the pockets (see template -- you can eyeball this if your protractor isn't handy). don't forget those flaps around each side which allow it to be glued in place. cut out one pocket the way you like it, then trace and cut the rest. (i stacked & cut five layers of brown paper at once to speed this up.)
5. prefold the pockets
it will make your life easier if you prefold your pockets before decorating them. to do this, cut a piece of cardstock (magazine reply cards are perfect for this) the size of your finished pocket. lay it in position over one of your pocket pieces, then fold against the cardstock template. (this is much faster than tracing lines in place then carefully folding each one.) then fold up the gluing flaps, and finally fold each gusset into place behind the pocket (along the dotted line in my template).
6. decorate your pockets
now the fun part! decorate the pockets with the pieces you tore out of the catalogs. tip: find that piece of cardstock you used to help you fold the pockets. place it behind an image you plan to use and hold this up to the light. position it where you like, then trace around the cardstock and cut out the image for a fast way to get pieces just the right size. add more images until you're happy.
eva had a grand time helping me with this part, doing much of the cutting and a bit of the gluing. she selected images i never would have thought of (like the hopscotch girl, or the flowered rug). and surprise, surprise -- the whole project was more fun and the end result is far more special because i followed her lead rather thank staying overly invested in a picture-perfect result (see? i'm learning, slowly but surely...)

7. number away...
arrange the pockets on your calendar backing the way you like before adding numbers -- this way you can find an arrangement you're happy with. add the cut-out numbers you found, or hand-draw numbers, or both.
8. glue and tape pockets in place
i found it worked to use tape for the sides of the pockets (where the tape could be hidden inside the pockets) but glue for the bottom edges (where tape would show).
9. fill and enjoy
hang up your calendar by the handle (if it has one), and fill with whatever you like. if you're worried about a wee one sneaking ahead a bit, you can secure the filled pockets closed with decorative stickers or tape. or just hang it really high up on the wall.
i can't even describe how excited my three-year-old is about her advent calendar. and it has a very practical purpose as well -- i don't have to try to answer "when will it be christmas?" on an hourly basis. now, just daily. :)
and maybe next year i'll create the heirloom advent calendar i seem to think i should be making... or maybe this is it? as eva would say, "we'll just have to wait and see."


50 comments:
This is fantastic!! I love that it uses up stuff I already have, and those little pockets are adorable.
This is such a fun idea, I love it! I'll be linking.
Fantastic job! This looks wonderful and I love how you recycled every aspect of it! Found you via Craft.
:)Maya
That's a great idea :)
What a fun and original idea! I was never really into advent calenders. My mother always had one for my kids. Your idea is something I would have enjoyed doing with the kids, too bad they are too old. Guess I have to wait for the grandkids now!
aak! I love this idea. So, do you have your tiny ornaments made already? That is by far better than filling the days with candy. Thanks for taking the time to make a tutorial.
:)
Love it! What a clever and inexpensive way to herald in Christmas. I'm constantly tearing stuff out of catalogs and magazines to collage with, and then filing them away and not using any of it. Now, I can make these!
I love this idea. I know what my kids and I will be doing tomorrow - thanks!
How stinkin cute is this project! Great idea!
Terisa
Love the idea! I can identify with you, I can't seem to get a focus. I love to knit, play around with fimo, decoupage and other stuff xD
Love this! Thanks for the wonderful directions! I'm going to make one!
My kids don't realise that you get advent calenders with chocolate either! Mine is a large felt tree and we add an ornament each day. I love your and have been thinking about making a birthday "advent" so i might use your idea but with windows rather than pockets.
Excellent, Thank You
what a great idea! i think this would also be a great way to recycle last year's christmas cards!
Holy crap. Are we on the same wavelength or what? I just blogged about an Advent calendar I made from Altoids tins: http://bit.ly/rQdz.
thanks, everyone, for all the lovely comments. we started our calendar this morning, and my 3 yr old was thrilled with her tiny ornament. she (predictably) wanted to peek in all the other pockets... nope, one a day. that would be the entire point. :)
i'd love to see links to photos of other advent calendars, or if anyone makes one inspired by this tutorial.
I cannot wait to make one! Thanks so much for sharing this idea! Way more special and pretty than the ones I've seen at Target etc. Charming!
love this idea! I have oodles of old Christmas cards begging to be turned into pockets this week!
I'm in! thanks for the idea!
simply fantastic!!!
i'll link your tutorial on my blog in a few days, if you don't mind
http://equazioni.wordpress.com/
fran
sure, fran, feel free to link.
I love this idea! It's a little late, but not TOO late to try the same thing. Plus I can make extras for the grandkids next year.
I'll feature this on my blog, www.endomental.com, on December 10.
I´m so sorry about my pour English, but I need to say you that I love your tutorial! I´m looking for a cross-stitch Advent Calendar anda I´ll use your idea!
Thank you!
Lia
This is a great idea!!!
Now we've got something to do on Saturday morning. A little late, I know, but that's ok I'll blame it on having two kids under 3 yrs old. :)
I also like not having candy in the pockets. We're still working on the Halloween candy (great bri-- I mean incentive for potty training) ;) and don't need Christmas candy too!
Thanks for the tutorial! I made my own version: http://www.flickr.com/photos/enchiladaplate/3078221041/
I have to confess that your pockets were too complicated for me (at least for me to do 24 of them!), so I simplified them a bit.
It is simply lovely - can't wait to try this!
That is wonderful!! Great idea :) (I'm a scattered crafter too)
~erika
This is a stellar project. I certainly can't accomplish it for this year, but I will start thinking on it for 2009!
This is brilliant - and your kids aren't the only ones that don't get candy in their advent calendar. Mine don't either. And growing up - it was always an ornament (the same ones every year). We loved the tradition anyway.
I've been making Ukrainian eggs for 16 years and yours are much better than mine are. Please tell me what kind of kitskas you use. I want to get as good as you are! I did the bee one last night.
Love your advent calendar
What a great idea. My 3 year old is going to love doing this project this year! I have a metric ton of school lunch-sized bags, so maybe I can figure out how to use those for pockets.
Good job!!
I love it, we will make one tomorrow, Thank you
What a treasure!!! And, I must say, it looks very professional:)
A lovely idea - we made one today. I'm suggesting a Christmassy activity for each day on a luggage label tag in each pocket (no candy here either) - read this, make that ornament, cook such and such, set up the tableau, whatever. Thanks for the inspiration.
PS I've since posted on making the calendar, and included a photo. Click here if you're interested! http://theideaofhome.blogspot.com/2009/11/lets-pretend-this-is-craft-blog.html.
alison, thanks for sharing yours, and i enjoyed your post. (and i'm with you on the consumer aspect of the holiday...)
I made one of these too after seeing yours (which I LOVE!!) I will be posting it soon & am also linking to yours. THanks for the inspiration :)
Olá! Eu amei a ideia do calendário, meu nome é katia e quando quiser visitar o meu blog é : www.flordakakau.blogspot.com
Bye
I work for a network of Christian radio stations and we're working on a Christmas newsletter to send to our donors. We wanted to include a Christmas craft that families could do together and I'd like permission to use your idea. I'd be glad to give you credit for it and also to promote your blog to our listeners (I think they'd LOVE what you post anyway!).
i love this idea--this will be a great project for my 7 year old to work on over thanksgiving break thus year!
I just starting putting together an advent calendar with these little mittens that I had and I thought, they're too hard to put stuff in and get stuff out for little fingers; then I went to check my Facebook page and someone had put this link up; BRILIANT and I love sealing the tops...I was wondering how to keep my 10 year old from peeking :) Now I know what I'm doing on Black Friday instead of shopping :)
Gostei da idéia. Simples e ecológica. Parabéns!
Fiz um post em meu blog sobre esse calendário e seu blog, espero que não se importe.
Bendiciones
@Sueli Pinheiro: Eu não me importo. Obrigado pelo elogio.
I made one with my son! This was a lovely idea and a multi-day project. He woke up this morning and was beyond excited to see it all pasted together with the first activity inside. Thank you for the inspiration
Hello, I just wanted to say thank you for sharing this wonderful idea! I made one with my daughter, and it came out great. I put photos on my blog and listed and linked back to your blog. You can see it here at www.splendidbluewren.blogspot.com. Happy Holidays!
-Teresa
You are a genius!
Thank you!
Mikki P
Stix'n'Stonz Fused Dichroic Glass
Thank you for the great idea. I'll share it with my russian and american friend if you do not mind. I'll give a full credit and link to your blog. Best wishes.
I absolutely love this idea! I love it! I'll be liking this on facebook!
I love how you used things you already had! And it turned out so cute!
I would love it if you would share this at my new 12 Days of Christmas in July linky party. You can link up here:
http://theprudentpantryblog.blogspot.com/2012/07/twelve-days-of-christmas-in-july-linky.html
I can’t wait to get organized for a peaceful and frugal holiday season!
LOVE LOVE LOVE!
I'm going to get to work on this right away and use old Christmas cards that I've saved!
Post a Comment